Motion Capture Pipeline
- Kayla Techmeier
- May 20, 2019
- 7 min read
Updated: May 21, 2019
Motion Capture is a game changer for most if not all productions, and learning how to handle Mocap data and how to apply it to characters cleanly is an important process. While I was in university getting my degree in Game Development and Design, the school installed a Vicon Motion Capture system. I was one of 5 students selected to attend the official training with the faculty during a winter break. We then put our heads together on how to teach this pipeline to the rest of the student body.
The official training that we had attended had been info packed and interesting, but it was about how to use the new hardware and software. There was a knowledge gap among us at the university on how to take that next step, how to retarget mocap skeleton data to a created rig. The university I attended did not teach any rigging courses, and by a product of that, there were very few students with general 3D skeleton knowledge. So a big hurdle for getting the students up to speed was giving them a crash course on Technical Art and how it applies to characters.
So we went to the drawing table. There was 3 students working on an independent study together that used the mocap, myself among them. Part of our task was to document the pipeline and make sure that it would be easy for anyone new to the process to pick it up fairly quickly. So we began to experiment with the system, generate data to clean and hook to characters. I documented both of these parts of the pipeline for the university and led a seminar for the students on my own time. I continue to be an on call consultant for the University about their mocap system.
I won't be going over how to clean mocap data, simply because it's different depending on the software package. However I will cover the combination of techniques we used to get our system up and running and what will be taught to the students using it in the future. This includes Motion Builder's story tracks for looping mocap for games, and using the Maya HIK system to retarget animation to a custom character.
Motion Builder's Looping Character Story Tracks
Mobu is a very powerful software that is rather under leveraged in a university setting for the most part. Mobu's Story timeline is a fantastic feature that allows for the blending of multiple clips in a cross fade of sorts. It's incredibly helpful for making perfect loops of natural motion such as mocap data. I started with going off of a well made tutorial from gameAnim, and adjusted it and enhanced it where needed to make sense for my University's set up. This is where it ended up.
So we've got some clean mocap of let's say a walking motion, and we'd like to loop that into a cycle for games or to extend the motion to last longer so we don't have to reshoot. First things is first, for any motion to be looped perfectly, there must be four full steps of captured data. This means if they start on their right foot it needs to go right foot hits ground, left foot hits, right foot hits, left foot hits, and end on right foot hitting again. This means that we have a right foot hit in the middle of our data which will be our loop point since it matches the beginning and the end.

Open MotionBuilder, and in the popup, set the control scheme to mimic Maya.
First find your length of data that fits the two full steps profile, and note down the frame range, we'll come back to that in a moment.
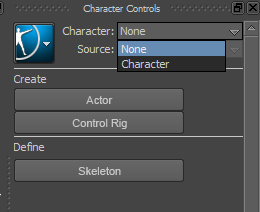
Then in the bottom right panel of motion builder, there is a tab called Asset Browser. If it's not already open, go ahead and click on it. Under the Templates section, there is a section called Characters.

The third down item in that section, just labeled Character, is what we want. Move around the viewport until you can clearly see the root joint of your actor. Click and drag the Character Icon from the Asset Browser onto the root joint of the skeleton.

It will have a popup that asks to characterize, click that and then Bipedal and it will make a character out of the skeleton. It will have no visual change but on the right side panel you should now see a Human IK panel. In the Character drop down there is now a new Character. Selecting that and then the definition tab, we can see that has a set of bones that are yellow and green. (or just green if you're lucky). The Yellow exclamation point is a warning that things are facing the wrong axis, but it doesn't harm our animation, so we'll ignore it.


Now that we've got a Character, we can turn on Story mode, which allows us to blend shots into each other or themselves which is how we're going to loop this animation.
First off, open the story tab on the bottom left panel, and make sure the text of Story is highlighted blue.

If so go ahead and right click in the grey area next to the timeline and Insert>Character Track.
Select your character from the little drop down list on the new track.

Once you've done that, we now have to insert the current animation into this track. Right click and select insert current take .

Now that we've got our current animation, we can trim it to our key ranges using the razor tool in our story timeline. Delete the unneeded parts. The important thing to note here is that we're trying to make the join seamless and unnoticeable. We're trying to find the passing pose (one foot up) that has a similar pose before and after it so that we've got a midpoint to loop on.

Now that we have our trimmed data, we need to align it to an axis to be sure that we can smoothly blend between it and the next take. Select the clip in the timeline, and then select the little eye shape on the left part of the track. Now you can move and rotate the clip in the viewport aligning it to an axis. Use CTRL+T to view it from the top for the easiest aligning. (CTRL+E to return to perspective view)

Knowing the frame number that your middle passing position happens, we can now blend the clip back on itself. Right click the clip you want, selecting copy. Move the timeline slider to exactly after the clip and then right click the track and select paste. We now have two identical clips immediately following each other. Move the timeline slider to the middle passing point of the first clip and then click drag the second clip back onto the first one, letting it snap to the timeline slider. The X shape that the story mode draws on top of the mixed space denotes the blending of the two animations.

Then we can repeat from the back side. Copy the clip again and blend it into the back half of the second clip. Then we can set our timeline bounds to be the start and end of that second clip and we've got a seamless loop!
But how do we get just that bit out?

Plot the data from Story to Take using Right click on timeline and choosing the second to top option: Plot Whole Scene To Current Take...
This makes the Current Take be what we had as our selected range in the top slider bar (double click in the number boxes to set what is the start and end)


Finally, using the Eye Icon on the Character Track in the Story panel, we can set the loop to take place at the 0,0,0 of the grid. Then Plot the scene to current take again. After this we're safe to export our fully looping data to an fbx. File> Save as...
Open in Maya, and prepare to attach to a character!
Maya's HIK
A few things we picked up rather quickly with the help of some online forum posts, was that we could retarget a humanoid using the HIK system. It is quite powerful when used correctly. The only issue with HIK that we had found is that there isn't much out there telling folks how to use it with best practices. Here's a short list of things we learned get a better result using HIK.
1. Define your skeleton for your rig in a true T-Pose. Get those arms as close to horizontal to the ground plane as possible, and those legs straight. Make sure the back isn't slouched.
2. Once you have defined the skeleton, click the lock icon in the HIK panel to lock them so that they can't change on you.
3. Only Define the custom rig pieces you need to track. For example with IK legs, you only need the pelvis controller mapped, and the feet themselves. It gets crazy if you try to map the pole vectors to the knees. Instead make a group above your pole vector controllers and parent constrain that to the feet and the hips. (This way the knees will generally point at the average vector between the hip and the foot itself. This is usually a good start.)
4. When defining the mocap skeleton, pick a frame right before the frame you want to start. Select all the bones in the mocap skeleton, and zero out the rotation values. The skeleton will be on it's back but you can take the hips and rotate it 90 so it's upright. Key all the bones like that on that one frame. This means that the skeleton is in a true T-Pose, as the rig is, and will provide a MUCH cleaner transfer of data. Only define the mocap skeleton after putting it to true t-pose. Then lock it's definition.
5. Bake the data onto the custom rig using the HIK functionality, and lock it down. Use Animation Layers to make minor adjustments and animate secondaries.
留言